Adding Form Fields to Your Certificate
At this point, you should have the PDF file of your certificate ready to add form fields and should be filled out completely besides the changing dynamic information that will be auto-generated by CN, for example, a user’s name, the date of issuance and expiration, and other information unique to each user. We will now begin the process for identify the dynamic form fields!
STEP8: Now it’s time to add the necessary form fields to be generated!
We recommend using Adobe Acrobat Pro: visit adobe.com/acrobat to begin. Please note that Adobe Acrobat Pro is required for form field editing — the free Reader won’t support it.
You can either:
- Click “Start free trial” for 7-day full access
- Or choose “Buy now” if you’re ready to purchase
Then you may choose your subscription plan.
You may also consider using free third-party PDF conversion websites, such as https://docupub.com/pdfconvert/
Please note that we cannot guarantee the results, as we have no control over third-party tools.
STEP9: Open Your PDF and Launch “Prepare a Form
Open the certificate file you designed (PDF format) in Adobe Acrobat Pro.
In the left toolbar, scroll and click on “Prepare a Form”. This tool converts any document into a fillable form.
STEP10: Select File & Start Form Creation
- A dialog box will appear — click “Select a file”.
- Choose your certificate PDF -> Click “Start”
Adobe will automatically detect potential fields (like underlined blanks), but you can manually add or adjust them as needed.
STEP11: Add a Text Field
Use the top toolbar to select the “Text Field” option.
Note: only add Fields that are compatible with CN (see tables below)
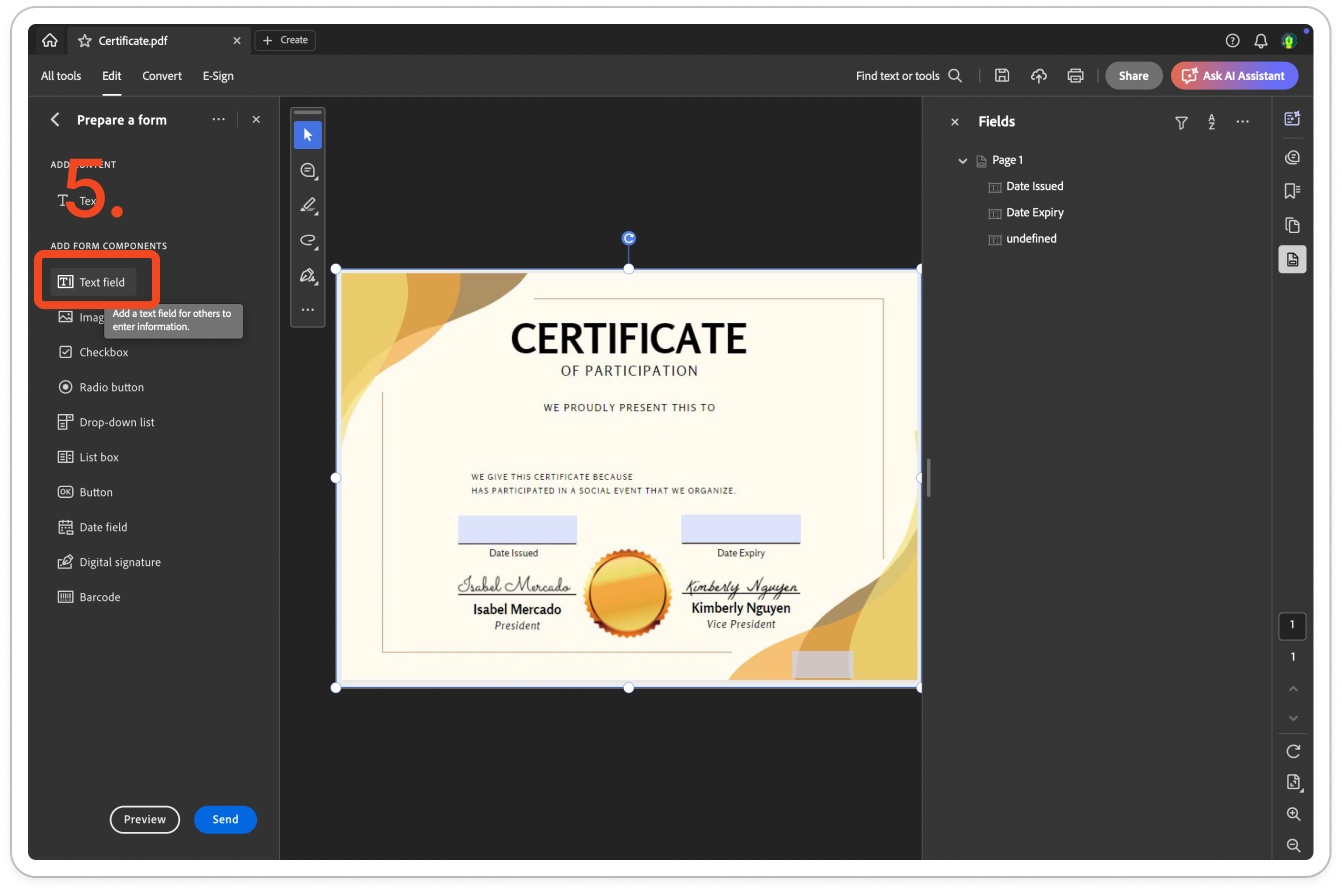
STEP12: Place the Field
Click anywhere on your document where you want the field (e.g., under “Name” or “Date Issued”)
Resize and align it for a clean fit
Press Enter to confirm. You can repeat this for each field you want to add.
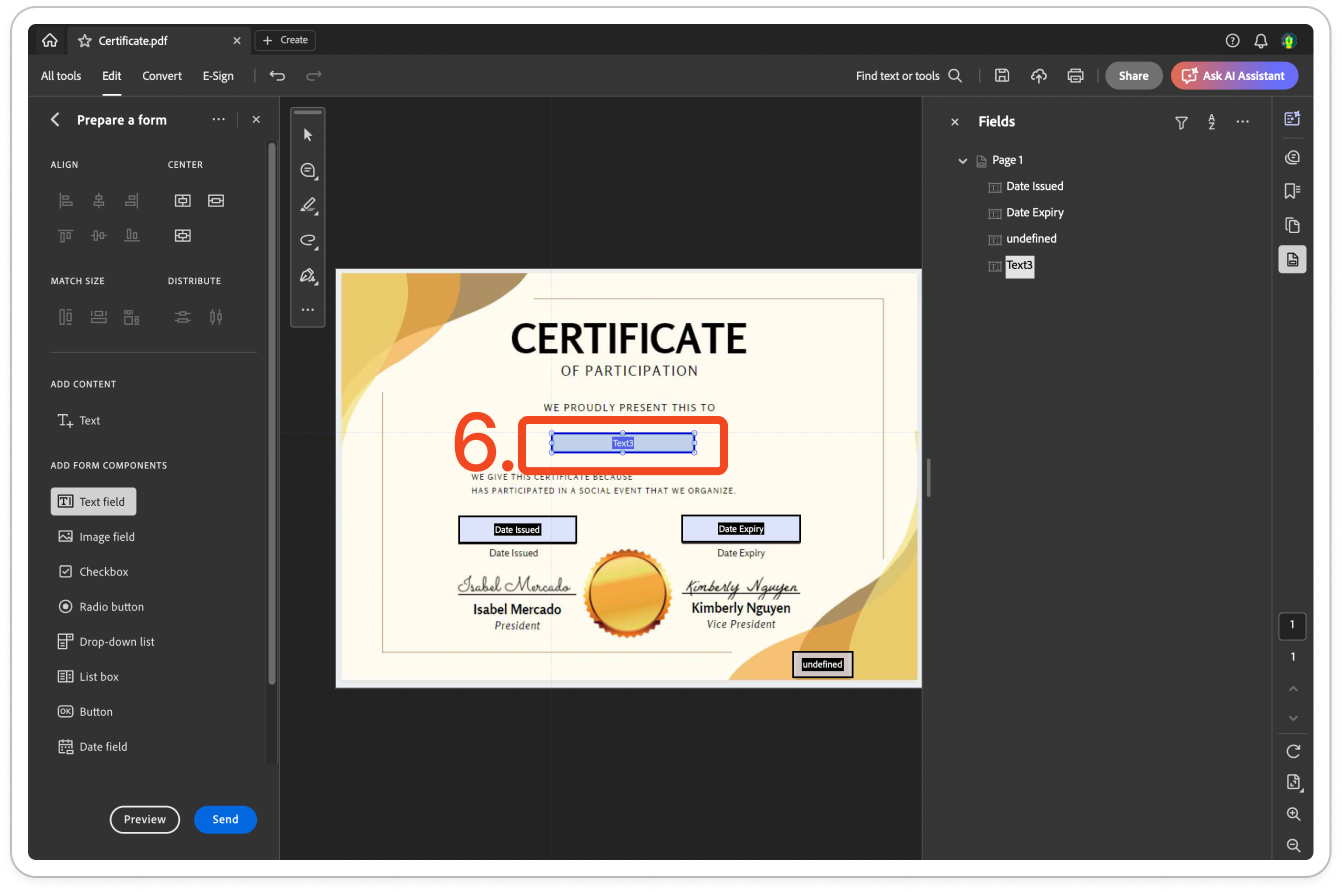
The “Name:” is Case-Sensitive and should match the “CN Supported Certificate Fields” exactly in Table1 and 2 below, otherwise the issued certificates will not generate properly.
Table 1: PDF Form Fields For CSV Issued Certificates
|
CN Supported Certificate Form Fields
|
Description *Required Certificate Fields
|
Example
|
Notes
|
|
Name
|
The name of the certificate recipient.
|
John Smith
|
|
|
Course_Program
|
The name of the course or program that issues the certificate.
|
2021 Security Training
|
|
|
Certificate_Issue_Date
|
The date that the certificate was awarded.
|
Jan 1, 2022
|
Enter the date into the .csv file as you would want it to appear on the certificate. Ex. Jan 1, 2022; 1/1/22, January 1st, 2022.
|
|
Certificate_Expiration_Date
|
The date the certificate expires.
|
Jan 12, 2024
|
Enter the date into the .csv file as you would want it to appear on the certificate. Ex. Jan 1, 2022; 1/1/22, January 1st, 2022.
|
|
Date_{X}_Year_After_Issue_Date
|
A date {X} years after the date the certificate was issued.
{X} is a number, ranging from 1 to 9.
For example:
- Date_1_Year_After_Issue_Date
- Date_2_Year_After_Issue_Date
- Date_9_Year_After_Issue_Date
|
Jan 12, 2024
|
If your certificate expires after a certain number of years, specify this field ONLY in the pdf filler tool, not Certificate_Expiration_Date and remove Certificate_Expiration_Date from .CSV if you wish to take this approach.
|
|
Message
|
A custom message that will be displayed on the certificate.
|
This training course requires 30 hours to complete.
|
|
Table 2: PDF Form Fields For CN Auto-Awarded Certificates (i.e. course completion certificates)
|
CN Supported Certificate Fields
|
Description *Required Certificate Fields
|
Example
|
Notes
|
|
Name
|
The name of the certificate recipient.
|
John Smith
|
CN will automatically fill this field when the certificate is issued.
|
|
Course_Program
|
The name of the course or program that issues the certificate.
|
2021 Security Training
|
CN will automatically fill this field when the certificate is issued.
|
|
Certificate_Issue_Date
|
The date that the certificate was awarded.
|
Jan 24, 2022
|
CN will automatically fill this field when the certificate is issued.
|
|
Date_{X}_Year_After_Issue_Date
|
A date {X} years after the date the certificate was issued.
{X} is a number, ranging from 1 to 9.
For example:
- Date_1_Year_After_Issue_Date
- Date_2_Year_After_Issue_Date
- Date_9_Year_After_Issue_Date
|
Jan 12, 2024
|
If your certificate has an expiration date, CN will calculate this date for each recipient based on when their certification issue date is.
|
|
Message
|
Custom message that will be displayed on the certificate.
|
This training course requires 30 hours to complete.
|
You MUST first identify this field on your certificate template, then compose this message through course completion settings.
|
Note, not all of the form fields are required on a certificate template. You only identify fields that you need.
STEP13: Save Your Document
After you have completed your certificate, please export it by Go to File -> Save As
Save the PDF by selecting the compatible version (PDF1.4) or Adobe PDF Files, Optimized
Now you’re ready to upload your newly created PDF to CN!


Comments
0 comments
Please sign in to leave a comment.